Monday, November 1, 2010

Spicy Roast Pumpkin and Peanut Soup


Baby it's cold outside... And pretty miserable. I had great intentions of going on a long walk, having a half day and all, but the rain put a stop to that. While sculling a hot cup of tea I decided what I really wanted was soup, and I set to work looking for some ingredients. I based the recipe on a Darina Allen one, but the peanuts were my own genius (if I do say so myself) idea. Anyway, here are the ingredients (although I didn't really measure anything).

  • 1 pumpkin (we had one left over from hallowe'en)
  • peanuts (shelled but not salted)
  • about 6 shallots (or two big onions I suppose. Red ones might be nice actually)
  • 2 tins of chopped tomatoes
  • garlic (that's upto yourself, I would put in loads but that's just me)
  • 1.5 litres stock (chicken, veg, whatever)
  • 0.5 litres orange juice
  • salt, pepper
  • nutmeg
  • cinnamon
  • thyme
  • cumin seeds
  • 6 whole cloves
  • wholegrain mustard (I had one with Guinness in it apparently. Good stuff)
With any of those spices at the end, it's upto you how much you put in, I like mine pretty spicy so I went with loads.

Right, Instructions Time.

  1. Chop up your pumpkin and scrape out the seeds and gunk from the middle. Roast in the oven for around half an hour to soften (best to rub a little olive oil on them first). Roast your garlic as well so it's nice and sweet.


2. While your pumpkin and garlic are roasting, shell your peanuts and put them in an oven proof dish with a little olive oil. Also, slice your shallots.


3. Throw the shallots into a large pot with some butter (you should probably melt it first). Take out the pumpkin and garlic and swap with the peanuts for roasting. If you have a massive oven you could maybe do all that at once but I don't. You should be able to scoop the pumpkin out of its skin and toss this into the pot with your shallots. Add in your garlic (if you've roasted it you can just squish it out of its skin, otherwise crush him) and chopped tomatoes and leave on a medium heat for around 10 minutes til everything gets a bit squishy.


4. At this point add in your roast peanuts, stock, orange juice and spices and give it a good stir. Leave it to simmer for a while and then take it off the heat so you can attack it with a handheld blender type of thing. What are they called? Is it just a blender? Anyway.


After this it's up to you really; need more salt? pepper? spicy stuff? mustard? I found I had to add a little sugar as the chopped tomatoes were a little bitter. Then give it one more blitz with the blender and make sure it's hot before you put it into neat little bowls.


Pretty darn good. Although afterwards I realised I would have liked it with brown bread and cheese. Mmmm. Maybe later... 

Thursday, August 12, 2010

A Tea Dress


I'm not going to lie, this is purely a gloating post. I MADE a dress. Oh yes. Out of fabric and zips and needles and threads and other amazing stuff (such as wundaweb...). ME!

Now I just need an occasion to wear it at. Exciting times!

Free dress patterns here (plus other cool stuff): http://www.burdastyle.com/patterns?free=1&most_recent=1

The one I made is called a "Danielle" dress.

Friday, August 6, 2010

Masquerade!


I mentioned last time that I've been running a summer camp with two friends (GAS craic - that's Guitar, Art and Singing and I teach the art workshops) so I thought I'd show off a little of what we did the second week with the older kids (11- 15 year olds).

During the second week we designed t-shirts, giant posters, treasure boxes, cd covers... but I think my personal favourite were masks. We took our inspiration from things like Lady Gaga, the Phantom of the Opera, animals, celebrities etc, and the kids set to work.

Here's one I made as an example:

They're pretty easy to make and lots of fun, and look great at a fancy dress party or even stuck up on a wall! 

  1. Draw out the shape of your mask on a sheet of card (or cereal box card is good too!) and cut it out.
  2. Place the cut out shape on to another sheet of card and trace around it - you need to cut this second one out for the back.
  3. Before sticking the two together, decorate it front and back with whatever you like - I like collage and sparkly things.
  4. Paste glue on the undecorated side of the back of the mask. Place a stick on one side for the handle (wooden skewers or lolly pop sticks are good) and if you want to have some feathers sticking out, go for it.
  5. Stick the front of the mask on top (so the stick and feathers and anything else are sandwiched inside).
  6. Leave to dry and then cut out the eyes! (If a grown up could do it with a stanley knife that's probably the easiest, if not, carefully pierce one eye part and then cut around from where you pierced it with the scissors)

And there you go! A good one for a rainy day...


Friday, July 16, 2010

Summertime and the living is...

surprisingly busy!

First of all, a big thank you to Lilly for Edna the Mermaid, who arrived some time ago and who is living it up at her new home! She's only gorgeous!


Where have I been for the last forever and what have I been doing? Well, some nothing here and there but mostly it's been a jam packed few weeks as I've been doing lots of illustrating, surfing in Donegal (or at least attempting to), visiting friends around the place, reading lots (American Gods by Neil Gaiman - do it), playing a bit of guitar, and generally doing stuff that doesn't involve the internet. However my main project at the minute has been this:


Myself and two friends are running a summer camp (yep with guitar, art and singing) at the minute. We're approaching the end of week 1, and week 2 starts Monday! So far it's been brilliant, but we are wrecked from all the running around! I run the art part, which this week involves poster making, painting murals, making maracas, painting t-shirts and face painting with a group of kids from ages 5-12. They're very talented and LOVE glitter.

Here are some of the maracas they made: 


Basically we got two plastic cups, threw in a few lentils, masking taped the two cups together, masking taped over the rest of the surface area (easier to paint) and then they let loose with the paint and sparkles and feathers!


Wednesday, June 2, 2010

Raspberry Dream


Oooh la la! I had great fun making this yesterday; it survived the night in the fridge and looked quite well this morning I must say! Basically it's a cheesecake recipe, made up of a few ideas from one of those Women's weekly cookbooks (they make me feel like I'm 65 when I buy them, but grannies make the best cakes so it's ok).

You need:
  • 225g of delicious biscuits (I used Hob Nobs but I think ginger nut biscuits would be good too)
  • 60g melted butter
  • 300g raspberries (frozen will do)
  • 2 tsps gelatine
  • 2 tbsps water
  • 375g cream cheese
  • 50g caster sugar
  • 2 tsps lemon juice
  • 300ml cream
  • a 22cm springform tin with cling film around the rim (but not the base, pop that back in after you put the cling film on).
Here's what I did:
  1. Smash up the biscuits in a sandwich bag with a rolling pin or something like that, and then add them to the melted butter and mix well.
  2. Spread this around the base of the tin and leave in the fridge for a half an hour while you make the other bits and pieces
  3. Mix the gelatine and water in a heatproof jug and leave to stand in simmering water for a few mins, stirring it until it's totally disolved. Leave to cool for a few mins.
  4. Beat the cheese, lemon and sugar in a bowl (yay for electric mixers), then beat in the cream and finally stir in the gelatine mix.
  5. Put the raspberries on top of the biscuit base and pour in your filling. It should look like this.


Then you can decorate with a few spare raspberries if you like.


Leave it in the fridge overnight and then you can pop open the tin, gently remove the cling film and be left with something like the picture at the top. A hoard of hungry teachers descended on mine and devoured it in 10 minutes flat. I manage to get a wee crumbly bit for myself... and it was good.

Tuesday, June 1, 2010

Blue Skies and Brass Chains


It seems like only yesterday (actually it was, wasn't it?) I was anticipating a heat wave... and now look! Well, "heat wave" might be a touch on the hyperbolé side of things, but at least there is sunshine! A good day all round actually -  make and do things arrived in the post, I got thank-you presents, plus got some good news on a prospective business venture... and made a cheesecake! (pics to follow, once it has set completely!)

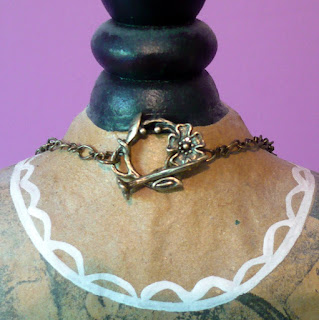
Anyway, remember the turtle locket I got? Well the make and do stuff what arrived today meant I could put it on a chain finally! Have a closer look!


I actually think the clasp is my favourite bit though. You might not be able to see below, but the little twig holding it shut is also a little brass flower.


I may still add a little more to it, but I'm happy with it for now!


Monday, May 31, 2010

Summer Nights


Tomorrow is June 1st and it's T minus 4 days until the Summer Holidays. Ultra-excitement. Unfortunately the weather has not been great today (a mild understatement...), but like every other Irish person, the 2 or 3 days of sun we have thus experienced this year has meant I have stocked up well on bikinis, shorts, maxi-dresses, sun hats, factor 50+ suncream, new sunglasses and various other sun-related paraphernalia in preparation for the blistering heat wave that is no doubt due to descend any day now (Friday would be good for me, please and thanks).

Further preparations for summertime-and-the-living-is-easy are afoot. In preparation for the good weather, guitar skills are being brushed up on, driving skills are being increased and the cost of wetsuits is being investigated (sure, it's the summer, I might as well take up surfing). Most importantly barbeques are being planned. Oh yes. With delicious items.

Today I decided to make some tea light holders to add to my summer items; every barbeque runs on into the dark of the evening, candles for the outdoors will definitely be needed in addition to music and fire and beers.


Taking some empty yoghurt pots (glass, not plastic - melty melty), wire and beads, I strung beads onto some wire.


Then I wrapped these around the rims of the pots and twisted the wire closed. I made another piece to use as a handle and there you go! A rather pretty pair I think!


Tuesday, May 18, 2010

Turtles, Trinkets and Treats


Pretty things arrived in the post today for make and do times! Here's my favourite - a little locket with turtles and a lily carved on it back and front. I must get some chain and ribbon though and get crafting at the weekend! Exciting!

Monday, May 17, 2010

Mice to meet you!


A little while ago I mentioned that I was illustrating a children's book for someone. Well I'm delighted to report that it seems one or two publishers are interested in it! All very tentative and nothing may yet happen but fingers crossed and raise your mugs to taking a chance!


This is another of the illustrations so far - more still to be completed! In the story the two main characters (the mice in the middle) bump into two pretty ladies... but unfortunately they turn out to be dolls belonging to the little girl of the house! They sit down and have a cup of tea anyway - which is what I'm going to do now!

Sunday, May 16, 2010

Four Last Songs

Accidentally-on-purpose (I didn't really mean it to become a pattern!), my last four posts have all had song titles as the post titles so I thought I would post up the songs to match the posts!


Baubles, Bangles and Beads (from Kismet. I love musicals)


A Thousand Words (My options for this are a song by Savage Garden - eek - or a song from Final Fantasy - I opted for neither although I must admit to loving Final Fantasy games, just not so much this one...)

Push the Button (Chemical Brothers or Sugababes... The first one I think I'd prefer, even though I suppose technically the song title is Galvanize...)


And finally, Shiny Happy People (who doesn't love it?)


I also just found out, after giving this post a title, that "Four Last Songs" were the final completed works by Richard Strauss before his death (thanks Wikipedia!). He wrote them when he was 84 but died before they were performed in public. The songs are "Frühling" (Spring), "September", "Beim Schlafengehen" (Going to sleep) and "Im Abendrot" (At sunset). They're quite pretty!

Fin

Baubles, Bangles and Beads


Bracelets are one of my favourite things to make. So easy and they make nice personal presents I think! This one is going to a new home tomorrow.


All you need are some beads and elastic, just make sure you do a double knot at the end! Then you can wrap it up in tissue paper and ribbon et voila! 

Tuesday, May 11, 2010

Push the Button


Button, button... who's got the button? Here's a small project that requires three small things:

  1. a button,
  2. some glue and 
  3. a ring. 

Put them together and what have you got? Tadaa!


I used a brass ring from a craft shop, but I think some pound-shop plastic ones would be great if you were making jewellery with kids!


Saturday, May 8, 2010

Shiny Happy People


A present that two of my favourite people made for me a while back after stressful coursework times. I was reminded of it this week during more stressful coursework times!

Wednesday, April 28, 2010

Operation Procrastination


"Ahhh, a tea set," you say. Yes, you'd be right there. A toy tea set that I received as a present and that I love, but which, alas, mostly lives on my shelf. So, I began to think of more useful uses for it...


Tea-cup pin cushions! 

With my trusty glue gun at the ready, a pair of old tights and a scrap of material, I set to work. I glued the cup and saucer together, cut up a pair of old tights, wrapped them in a piece of material and glue-gunned the ball of tights and material in place, taking care to tuck in any stickyoutty bits before glueing. You could sew the ball together first, but as I had the glue gun to hand it was the easiest thing to do.

Eggcup pin cushions would very cute too I think, and quite inexpensive. I used old tights for the filling but you could also use polyester. I went with the recycling option; socks would do just as well as tights though, plus you'd get the benefits of exterminating the "lone sock" phenomenon...


The teapot is next... A button-holding teapot? Hmmm.

Tuesday, April 27, 2010

These are a few of my favourite teas

As I'm supposed to be studying at the moment, about the only thing I'm making is tea, and the only thing I'm doing is drinking said tea. So, given the name of my blog, I think maybe it's time I dedicated a little bit of time and typing to tea.


My top 3 favourite teas in a bag (this week) are:

1. Barry's Gold Blend - half a spoon of sugar and a drop of milk thanks. Good at anytime of the day or night. Freaking out over exams? Calms you down. Not got enough of The Fear (you know the one -  forces you into action)? Gets you going. Bit too tired? Wakes you up. Bit too hyper? Chills you out. My favourite tea of all time.
Also great for The Chats.

2. Twinings Camomile and Spiced Apple - just delicious. Good before bed and has a nice cinnamon kick to it. Maybe a bit more of a cold weather tea, but as it's a bit chilly today I'll allow it.

3. Twinings Green tea with Pineapple and Grapefruit - to counteract the autumnal tea I just mentioned, here's a lovely spring one. Good for a kick. Zesty, tangy and tasty.

Although I usually get these at the shop, I just discovered (as I attached links), that you can do a tea "pick n' mix" on the Twinings website! How cute!

What's that? You want something to go with your tea? Well, if you're looking for something to go with the already brilliant combination of a nice cup of tea and a sit down then you should definitely click that link, for the most comprehensive compilation of biscuits and cakes known to man (or perhaps more correctly, grannies, as grannies usually have a better selection than men) - including plenty of reviews, a few classics, some biscuits from far far away, and the classic debate on the jaffa cake! It also comes in book form.

(not mine but nicely appropriate, n'est pas?)


Thirsty?

(any suggestions for teas to try are most welcome!)

Thursday, April 22, 2010

Buried Treasure!


Arghhh me hearties, what's this that's been dredged up for the depths of my aunt's cave of wonders? Only a Singer Sewing Machine! Well! Ok, to be honest, she gave it to me ages ago and I said, wow I love it, and then put it away, never to be seen again until now... because, as I've already mentioned, I can only really stitch things back together, not really sew things.


However, inspired by my new sewing kit, I have salvaged it from the wreckage and am going to clean it up, get it fixed and make something from scratch! Madness. I must get some parts though so don't expect an immediate ball gown or anything! 

P.S. it's 106 years old and was made in Elizabeth in New Jersey! I love that the internet could find that out for me!

Wednesday, April 21, 2010

Recession!


Ah the recession... forcing students everywhere to mend things instead of throwing them out. Having spent about an hour rooting through my highly organised room, searching valiantly for a needle and thread (I know I had some carefully stored in some box or bag or something or other in a very safe place...), I realised I needed a sewing box! Now, I can't really sew. But, occasionally, I can stitch things back in place, like buttons or hems or other boring things, so of course I need somewhere to keep needles and threads and buttons and ribbons and other odds and ends...

Anyway, I found a small hat box during my quest and made this. Instructions are as follows: 

1. Find one box - whatever shape you like!
2. Stick things on it - pictures, glitter, pasta, ribbons, whatever tickles your interest! I went with a picture of a lady sewing (how apt) from an old magazine.


3. Lash a bit of PVA glue on afterwards to make it nice and shiny (I haven't done that bit yet, best to do that outside or in a well-ventilated area and make sure you don't accidentally glue it to the table) and keep everything in place happily ever after.


Here's what I put on the other side!

So, anyway, back to the recession - encouraging mending stuff, recycling and make-and-do everywhere (or at least in my room).

(Plus I figured out how to use bluetooth to upload pictures from my phone to my computer - c'est une miracle!)

Monday, April 12, 2010

Hickory Dickory Dock...


For the longest time, I've wanted to write books. All kinds of books - children's books, adults' books, magical books, serious books, life-changing books, life-lamenting books, heart-warming books, heartbreaking books... Many ponderings of my inner monologue begin "when I write my bestselling, Booker-winning novel I'll..." 

But that's the bigger picture, the happy-ending if you will, when I have already toiled long and hard, and my fingers are worn away from bashing the keyboard, and I'm bleary-eyed from absorption in a world of my own creation... At the moment though, my writing is a long long way from a Booker Prize, and I must content myself with little ramblings and doodles.

However, as I mentioned, I want to write all kinds of books, and besides my much acclaimed, life-changing novel, I also want to write and illustrate children's books. In fact I do, what I mean is I want to get some published. One or two lie in various states of completion hidden in notebooks and word documents and sketchpads, strewn (I say strewn, but it's more for effect, I'm actually more of an organiser by colour, alphabet, size...) higgeldy piggeldy around my studio (ehem... by that I mean two shelves in my bedroom).

Anyhoo, here's the point.

I was asked to illustrate a fully written children's book by another author! I said yes, as any opportunity to add to and widen my portfolio is a good one. The stories are very sweet, featuring two little mice, and are for the bedtime-stories reader/listener. Obviously I can't put up the stories as they are not mine (and it would spoil the surprise!), but here is a little sneak peak at one of my illustrations so far. 


I'm quite excited about it today as the first section of the book has been printed to conduct a bit of market research (5 year olds are harsh critics, wish me luck!) and to send to potential publishers. So far I think it's looking pretty good though and hopefully I will be posting more about this project soon!